

Let’s be honest – who hasn’t abandoned the idea of making sugar cookies because you just couldn’t face the rolling, cutting, and decorating marathon? I’ve been there too many times! That’s where sugar cookie bars swoop in to save the day. They deliver that classic, nostalgic sugar cookie taste we all crave, but without the fuss that makes you question your life choices halfway through baking.
I’m about to walk you through everything you need to know about these game-changing treats – from a foolproof recipe that even my cooking-challenged brother can handle, to fun variations that’ll make people think you spent hours in the kitchen (when we know you were actually binging Netflix).
What Makes Sugar Cookie Bars Recipe Special?
Think of sugar cookie bars as the laid-back cousin of traditional sugar cookies. They bring all the flavor to the party without any of the high-maintenance drama. Instead of hunching over cookie cutters for an hour, you just press the dough in a pan, bake, frost, and cut. Done!
Here’s why I can’t stop making them:
- They’re a massive time-saver: No more batch after batch of cookies rotating through your oven. One and done!
- The texture is spot-on: You get that perfect balance – soft and chewy centers with just enough crispness around the edges.
- They feed a crowd: Last-minute potluck? Class party you forgot about? These bars have your back.
- You can switch them up easily: Change the frosting, add sprinkles, mix in some flavor – the possibilities are endless.
- They’re almost impossible to mess up: Even when I’m having my worst kitchen day, these bars turn out great.
The real magic here is how something so simple can taste so darn good. My friends always ask for the recipe, assuming it must be complicated. Their faces when I tell them how easy these are? Priceless!
Essential Ingredients for Perfect Sugar Cookie Bars
The beauty of these bars? You probably have everything you need in your kitchen right now. No emergency trips to the grocery store required!
Base Ingredients:
- Butter: Room temperature is key here – cold butter won’t cream properly, and melted butter changes the whole texture. I leave mine out for about an hour before baking.
- Sugar: Regular granulated sugar works perfectly. Some recipes add a bit of powdered sugar for extra tenderness, but I find it’s not necessary.
- Eggs: These bring everything together and add moisture. Room temperature eggs blend better than cold ones straight from the fridge.
- Vanilla Extract: Don’t skimp here! That cheap imitation stuff just doesn’t cut it. Good vanilla extract makes a noticeable difference.
- Flour: All-purpose flour is your friend. No need for anything fancy.
- Leavening Agents: A little baking powder or baking soda gives just enough lift.
- Salt: Even sweet treats need salt! It balances the sweetness and makes the vanilla flavor pop.
For the Frosting:
- Butter: Again, room temperature makes all the difference between smooth frosting and a lumpy mess.
- Powdered Sugar: Gives that creamy sweetness we all love.
- Vanilla Extract: Keeps the flavor consistent with the bars.
- Milk or Heavy Cream: Just enough to make it spreadable – you can adjust to get exactly the consistency you want.
- Fun Extras: Food coloring, sprinkles, or other flavors if you’re feeling creative!
Classic Sugar Cookie Bar Recipe
This is my go-to recipe that never disappoints. I’ve made it for everything from office parties to family gatherings, and the pan is always empty by the end.
Ingredients:
For the Bars:
- 1 cup (2 sticks) unsalted butter, softened
- 1 cup granulated sugar
- 2 large eggs
- 1 tablespoon pure vanilla extract
- 3 cups all-purpose flour
- 1 teaspoon baking powder
- ½ teaspoon salt
For the Frosting:
- ½ cup (1 stick) unsalted butter, softened
- 2½ cups powdered sugar
- 1 teaspoon vanilla extract
- 2-3 tablespoons milk or heavy cream
- Food coloring and sprinkles (optional, but why wouldn’t you?)
Instructions:
Prep Your Pan: Heat your oven to 350°F (or 325°F if you’re using a glass pan). Line a 9×13-inch baking pan with parchment paper, leaving some hanging over the sides to create handles. Give the parchment a light spray with cooking oil to make spreading easier.
Make the Dough:
- Beat the butter and sugar together until it looks light and fluffy – about 2-3 minutes. Don’t rush this step! It’s where the magic happens.
- Add eggs one at a time, mixing well after each. The mixture might look a little curdled – totally normal!
- Mix in the vanilla extract – it’ll smell amazing.
- In a separate bowl, whisk together flour, baking powder, and salt.
- Gradually add the dry ingredients to your wet mixture, mixing just until combined. The moment it comes together, stop mixing! Overmixed dough equals tough cookies.
- Bake the Bars:
- Press the dough evenly into your pan. This can be tricky, so try one of these hacks:
- Spray an offset spatula with cooking spray
- Wet your fingers slightly before pressing
- Break up the dough into small pieces across the pan first, then press them together
- Bake for 15-17 minutes. Here’s the crucial part: take them out when they still look slightly underdone! The edges should barely be turning golden, and the center might look a tiny bit soft. Trust me on this – they’ll continue cooking after you take them out.
- Let them cool completely in the pan. I know it’s tempting to frost them right away, but patience pays off.
- Make the Frosting:
- Beat the softened butter until it’s smooth and creamy.
- Add powdered sugar gradually – unless you enjoy wearing it. (Been there, done that!)
- Mix in vanilla and enough milk to make it perfectly spreadable – start with less, you can always add more.
- Add food coloring if you want. I find that gel food coloring gives the best colors without making the frosting runny.
- Finish the Bars:
- Spread your frosting over the cooled bars. Get creative with swirls if you’re feeling fancy!
- Add sprinkles right away before the frosting sets.
- Cut into squares or rectangles. For the cleanest cuts, wipe your knife between slices.
Expert Techniques for Sugar Cookie Bar Success
After making these bars more times than I care to admit, I’ve picked up some tricks that make all the difference between “pretty good” and “can I please have that recipe?!”
1. The Golden Rule: Don’t Overbake
I cannot stress this enough! When in doubt, underbake slightly. These bars should come out of the oven when:
- The edges have just a hint of golden color
- The center looks like it needs another minute (it doesn’t!)
- A toothpick comes out with a few moist crumbs clinging to it
The first time I made these, I baked them until they “looked done” – big mistake! They were dry and sad. Remember, they’ll continue baking from residual heat even after you pull them from the oven.
2. Mix Like You Mean It (But Know When to Stop)
The way you mix your ingredients makes a huge difference:
- Really cream that butter and sugar until it’s light and fluffy – about 2-3 minutes with an electric mixer
- Add eggs one at a time, mixing well between additions
- Once you add flour, become a minimalist mixer! Just until combined, then hands off
- Overmixed dough is the fast track to tough, dense bars instead of the tender treats we’re after
3. Set Up Your Pan for Success
A little preparation goes a long way:
- That parchment paper “sling” makes removing the bars so much easier
- Greasing under the parchment keeps it from sliding around while you’re spreading dough
- Spread the dough as evenly as possible for uniform baking
- Different pans can affect baking time:
- Metal pans: Stick with the recipe timing
- Glass or ceramic pans: Drop the temperature by 25°F and maybe give them an extra minute or two
4. Frost Like a Pro
The frosting is where these bars go from good to “I’m going to need another piece”:
- Make sure your bars are completely cool – warm bars = melted frosting
- For extra fluffy frosting, beat the butter longer (3-5 minutes)
- Add powdered sugar in batches (unless you enjoy cleaning it off your ceiling)
- Gel food coloring works better than liquid for vibrant colors
- An offset spatula makes spreading so much easier
- Add sprinkles immediately after frosting while it can still “grab” them
Three Delicious Sugar Cookie Bar Variations
Once you’ve mastered the classic recipe, why not shake things up a bit? These variations have all been tested (multiple times, for science) and are guaranteed crowd-pleasers:
1. Cream Cheese Sugar Cookie Bars
These have a slight tanginess that balances the sweetness perfectly. My friend who “doesn’t like desserts” (who are these people?) asks for these specifically.
Key Changes:
- Cut back on butter to ¾ cup and add 4 oz softened cream cheese to your dough
- Bump up vanilla to 1½ tablespoons
- Add ¼ teaspoon almond extract if you’re feeling fancy
- For the frosting, mix in 2 oz cream cheese and 1 teaspoon lemon juice
Pro Tip: These might need to bake a tiny bit longer (18-20 minutes) but should still have that magical soft center.
2. Lemon-Accented Sugar Cookie Bars
Perfect for spring and summer gatherings! These taste like sunshine and happiness.
Key Changes:
- Add 1-2 tablespoons fresh lemon zest to your dough (use a microplane grater for best results)
- Swap out 1 teaspoon of vanilla for 1 teaspoon lemon extract
- For the frosting, add 1 tablespoon lemon juice and 1 teaspoon lemon zest
- A drop of yellow food coloring makes them look as sunny as they taste
Pro Tip: Lemon bars benefit from an even shorter baking time (10-12 minutes) for that perfect soft texture.
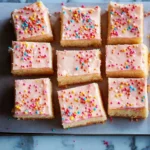
3. Funfetti Sugar Cookie Bars
Birthday party? Bad day? Tuesday? These colorful bars bring instant joy. My niece requests these for every occasion, birthday or not.
Key Changes:
- Fold ⅓ cup rainbow sprinkles into the dough (the longer jimmies work better than the tiny round nonpareils)
- Use clear vanilla extract to keep the dough light colored so the sprinkles pop
- Mix another ¼ cup sprinkles into the frosting
- Go wild with different sprinkles on top – mix shapes and sizes for the most fun look
Pro Tip: Pop the dough in the fridge for 15 minutes before baking to keep the sprinkles from bleeding too much color.
Storage and Make-Ahead Options
Let’s be real – you probably won’t have leftovers. But just in case you do (or you want to make them ahead):
Room Temperature Storage
- Store in an airtight container for 3-4 days
- If you’re stacking them, put wax paper between layers
- Interestingly, frosted bars actually stay moister longer than unfrosted ones!
Refrigeration
- Pop them in an airtight container in the fridge for up to a week
- Let them come back to room temperature before eating – the texture and flavor are much better
- This is especially helpful if your kitchen runs warm and the frosting gets too soft
Freezing Options
- Unfrosted bars: Wrap them tight in plastic wrap then aluminum foil; they’ll keep for up to 3 months
- Frosted bars: Freeze them uncovered until the frosting hardens, then wrap them up; best used within a month
- Make-ahead dough: Make the dough, press it into a lined pan, wrap tightly and freeze for up to a month; thaw in the refrigerator before baking
I often make a double batch and freeze half (unfrosted) for dessert emergencies!
Troubleshooting Common Issues
Even I’ve had some sugar cookie bar fails. Here’s how to fix the most common problems:
Problem: My Bars Came Out Dry and Crumbly
Solutions:
- Cut your baking time by 2-3 minutes next time
- Check your oven temperature with an oven thermometer – many ovens run hot!
- Make sure your butter was properly softened before mixing
- Be careful with flour measurement – spoon it into your measuring cup rather than scooping directly from the bag
Problem: The Dough Is Fighting Me When I Try to Spread It
Solutions:
- Let it sit at room temperature for 10 minutes if it feels too stiff
- Try using a spatula sprayed with non-stick spray
- Slightly wet fingers work wonders for pressing dough
- Distribute small chunks of dough around the pan before trying to create an even layer
Problem: My Bars Baked Unevenly
Solutions:
- Rotate your pan halfway through baking
- Check that your oven rack is in the center position
- Take extra care to spread the dough at an even thickness
- Consider getting an insulated baking pan if this happens regularly
Perfect Occasions for Sugar Cookie Bars
These versatile treats are my go-to for so many situations:
- School Functions: They transport easily and kids go crazy for them
- Bake Sales: Package individual bars in clear wrap with cute ribbons – they’ll sell out first!
- Holiday Gatherings: Change up the colors and sprinkles to match any holiday
- Office Potlucks: When you want to be the office hero without staying up all night baking
- Last-Minute Company: These come together so quickly when someone texts “we’re in the neighborhood!”
- Care Packages: They ship beautifully and stay fresh for days
- Just Because: Sometimes Tuesday needs a little something special
Creative Customization Ideas
The basic recipe is just your starting point. Here’s how to make these bars truly your own:
Flavor Additions
- Try almond extract instead of (or alongside) vanilla for a sophisticated twist
- Add citrus zest – lemon, orange, or lime all work beautifully
- A pinch of cinnamon or nutmeg adds warmth for fall and winter
- Crush freeze-dried strawberries or raspberries into powder for natural color and flavor
Holiday Adaptations
- Valentine’s Day: Pink frosting with heart sprinkles (my partner’s favorite version)
- St. Patrick’s Day: Green frosting with gold sprinkles
- Fourth of July: White frosting with red and blue sprinkles arranged in sections
- Halloween: Orange frosting with black and purple sprinkles (or make them “monster” bars with candy eyes!)
- Christmas: Alternate red and green frosting sections for a festive look
Decorative Techniques
- Use a piping bag to create simple patterns on top
- Try swirling two frosting colors together for a marbled effect
- Leave a border around the edge unfrosted for a “naked” look
- Use cookie cutters on the baked sheet before frosting for shaped bars
- Create ombré effects by gradually adding more food coloring across the frosting
Frequently Asked Questions
Q: Can I make these bars gluten-free?
A: Absolutely! I’ve had great results using a 1:1 gluten-free flour blend. The texture might be slightly different, but they’re still delicious. My gluten-free friend said she couldn’t tell the difference!
Q: Why did my bars puff up like a cake?
A: You might have been a bit heavy-handed with the leavening. Double-check your measurements of baking powder/soda, and make sure you’re spreading the dough evenly in the pan.
Q: Can I use plant-based butter instead?
A: Yes! Plant-based butter sticks (not the tub spreads) work really well. I made these for my vegan niece, and everyone was grabbing for them.
Q: How do I really know when they’re done baking?
A: Look for barely golden edges with a center that looks slightly underdone. A toothpick should come out with a few moist crumbs, not wet batter. When in doubt, it’s better to underbake than overbake!
Q: Can I make a smaller batch?
A: Definitely! Cut all ingredients in half and use an 8×8-inch pan. Start checking for doneness about 2-3 minutes earlier than the full recipe.
Q: Help! My frosting looks grainy. What went wrong?
A: This usually happens when the powdered sugar isn’t fully mixed in. Try adding it more gradually and beating longer. If you’re really having trouble, sifting the powdered sugar before adding it works wonders.
Why You’ll Love These Sugar Cookie Bars
What makes these bars truly special is how they give you maximum wow-factor with minimum effort. I can’t count how many times these have saved me when I needed something sweet in a hurry.
As my friend Jess said after trying them: “I’ve made these or a variation of these at least half a dozen times and they literally. Never. Fail. So easy, so much reward for so little effort.“
Whether you’re an experienced baker or someone who gets nervous around measuring cups, these bars are nearly foolproof. They adapt to any occasion, any season, and any flavor preference.
Next time you’re staring down a baking deadline or just craving something sweet without the hassle, remember these sugar cookie bars. They’re the kitchen equivalent of that reliable friend who always shows up when you need them most!
Have you tried making sugar cookie bars? I’d love to hear about your favorite variations or decorating ideas in the comments below!
PrintGrandma’s Sugar Cookie Bars – Sweet and Simple
These soft and chewy sugar cookie bars bring all the nostalgic flavor of classic sugar cookies without the hassle of rolling or cutting. They’re quick, customizable, and nearly foolproof—perfect for parties, potlucks, or just because!
- Prep Time: 15 minutes
- Cook Time: 15-17 minutes
- Total Time: 30-35 minutes
- Yield: 24 bars 1x
- Category: Dessert
- Method: Baking
- Cuisine: American
- Diet: Vegetarian
Ingredients
- 1 cup (2 sticks) unsalted butter, softened
- 1 cup granulated sugar
- 2 large eggs
- 1 tablespoon pure vanilla extract
- 3 cups all-purpose flour
- 1 teaspoon baking powder
- 1/2 teaspoon salt
- For the Frosting:
- 1/2 cup (1 stick) unsalted butter, softened
- 2 1/2 cups powdered sugar
- 1 teaspoon vanilla extract
- 2–3 tablespoons milk or heavy cream
- Optional: food coloring and sprinkles
Instructions
- Preheat oven to 350°F (325°F for glass pans). Line a 9×13-inch baking pan with parchment paper, leaving overhang for easy removal, and lightly spray with cooking spray.
- In a large bowl, beat butter and sugar until light and fluffy (2-3 minutes).
- Add eggs one at a time, mixing well after each. Stir in vanilla extract.
- In a separate bowl, whisk together flour, baking powder, and salt.
- Gradually add the dry mixture to the wet, mixing just until combined.
- Press dough evenly into the prepared pan using a spatula or wet fingers.
- Bake for 15–17 minutes, until the edges are just starting to turn golden and the center is slightly underbaked. Cool completely in the pan.
- For the frosting: beat softened butter until creamy, gradually add powdered sugar, then mix in vanilla and milk until smooth and spreadable. Add food coloring if desired.
- Spread frosting over cooled bars and top with sprinkles. Cut into squares once set.
Notes
- Don’t overbake—pull them when the center looks just underdone for soft bars.
- Use gel food coloring to avoid runny frosting.
- Cool completely before frosting for the best results.
- Try different extracts or zest for fun flavor variations.
- Use parchment paper for easy pan removal and neat cuts.
Nutrition
- Serving Size: 1 bar
- Calories: 230
- Sugar: 23g
- Sodium: 95mg
- Fat: 12g
- Saturated Fat: 8g
- Unsaturated Fat: 3g
- Trans Fat: 0g
- Carbohydrates: 30g
- Fiber: 0g
- Protein: 2g
- Cholesterol: 35mg
Keywords: sugar cookie bars, easy sugar cookies, frosted cookie bars, soft sugar cookies, dessert bars