

Introduction: Why Bars Beat Traditional Cookies
Have you ever found yourself craving homemade oatmeal cookies but just couldn’t face the thought of scooping and baking batch after batch? Trust me, I’ve been there!
That’s when oatmeal cookie bars swooped in to save my dessert dreams. These delightful treats give you all that chewy, buttery goodness you love about traditional oatmeal cookies but with way less work – just mix, spread in a pan, and bake.
No more standing by the oven for an hour!
As one tired baker confessed on Sugar Spun Run, these bars are perfect for “when you really want cookies but are just too lazy to spend an hour scooping cookie dough.” (I feel seen!)
But don’t think these are just a shortcut – many people, myself included, actually prefer these bars to regular cookies because of their incredible texture. Those perfect edges with that soft, chewy center? Absolute heaven.
What Makes Oatmeal Cookie Bars Recipe Special?
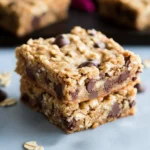
The Perfect Texture Trifecta
What makes you reach for a second (or third) oatmeal cookie bar? It’s all about that irresistible texture:
- Thick and substantial: These aren’t those thin, disappointing cookies. Each bite feels like something you can really sink your teeth into
- Chewy centers: That soft, moist middle gives you the perfect chewy satisfaction
- Slightly crisp edges: The golden perimeter adds just enough contrast to make each bite interesting
I’ve watched people’s eyes light up when they bite into these bars – they’re “buttery, thick, chewy, and chock full of oats.” One friend called them “perfectly oaty” right before she asked for the recipe. They tend to disappear from the plate faster than I can say “Would you like another?”
Convenience Without Compromise
Let’s be real – the practical perks make these bars a total game-changer:
- One-pan simplicity: Just one baking dish and you’re done – no rotating cookie sheets in and out of the oven
- No fancy equipment: A bowl and spoon will do the job – your mixer can take the day off
- Make-ahead friendly: They actually taste better the next day, and they freeze beautifully
- Travels well: No more showing up to potlucks with a container of broken cookies
The Science Behind Perfect Oatmeal Cookie Bars
Understanding what makes these bars tick helps me nail it every time:
Critical Components
Butter: Brings richness and that melt-in-your-mouth quality. When I brown the butter (especially for healthier versions), it adds this nutty depth that makes people ask, “What’s your secret?”
Brown Sugar: The molasses in brown sugar is the magic behind that signature chewiness. I’ve found the more brown sugar compared to white, the chewier your bars will be. (Life-changing discovery!)
Oats: Old-fashioned rolled oats are non-negotiable here. They slowly drink up moisture while baking but hold their shape, creating that perfect chewy texture. Quick oats just don’t cut it.
Baking Time & Temperature: 350°F lets the bars cook evenly without drying out. The center should look slightly underdone when you pull them out – they’ll finish cooking from the residual heat. Trust me on this one!
Master Recipe: Traditional Oatmeal Cookie Bars
This recipe combines all the best elements from countless batches I’ve made over the years.
Ingredients
- 1 cup (2 sticks) unsalted butter, softened
- 1 cup packed brown sugar
- ½ cup granulated sugar
- 2 large eggs, room temperature
- 2 teaspoons vanilla extract
- 1½ cups all-purpose flour
- 1 teaspoon baking soda
- ½ teaspoon salt
- 1 teaspoon cinnamon (optional but so worth it)
- 3 cups old-fashioned rolled oats
- 1½ cups chocolate chips (semi-sweet, milk, or mix them up)
- Optional add-ins: 1 cup chopped walnuts, ½ cup coconut flakes, or ½ cup dried cranberries
Step-by-Step Instructions
Prep: Heat your oven to 350°F. Line a 9×13-inch baking pan with parchment paper, leaving some hanging over the sides (you’ll thank me later when it’s time to lift them out). Want thicker bars? Use a 9×9-inch pan and add about 10 minutes to the baking time.
Cream butter and sugars: In a large bowl, beat the softened butter, brown sugar, and granulated sugar until they’re well combined and slightly lighter in color.
Add wet ingredients: Beat in eggs one at a time, then stir in vanilla extract until everything’s nicely mixed together.
Combine dry ingredients: In a separate bowl, whisk together flour, baking soda, salt, and cinnamon (if using).
Create dough: Gradually add the dry ingredients to the wet ingredients, mixing just until combined. Fold in the oats, followed by chocolate chips and any optional add-ins. Don’t go crazy with mixing – just enough to bring it all together.
Transfer and press: Spread the dough evenly in your prepared pan, pressing firmly into corners and creating a smooth surface. This pressing step is key – I learned the hard way that skipping it leads to crumbly bars!
Bake: Pop it in the oven for 25-30 minutes for a 9×13 pan (or 35-40 minutes for a 9×9 pan) until the edges turn golden brown and the center looks set but still slightly soft.
Cool completely: Let the bars cool in the pan for at least 1 hour before lifting out using the parchment paper and cutting into squares. I know it’s torture to wait, but your patience will be rewarded!
Pro Tips for Perfect Results
- Room temperature ingredients blend so much better (I set mine out while I have my morning coffee)
- Don’t overbake – they’ll continue to set as they cool
- For clean-cut squares, pop them in the fridge for 30 minutes before cutting with a sharp knife
- Try the salt trick: My friend Lisa taught me to sprinkle just a tiny bit of flaky salt on top. OMG! Game-changer!
Healthier Alternative: Gluten-Free Maple Oatmeal Cookie Bars
When my gluten-free friends come over, I make this version inspired by Half Baked Harvest. They never feel like they’re missing out!
Ingredients
- ¾ cup unsalted butter
- 1½ cups almond flour
- 1 teaspoon baking soda
- ½ teaspoon salt
- 3 cups old-fashioned rolled oats (certified gluten-free if needed)
- 2 large eggs, room temperature
- ⅔ cup pure maple syrup
- 2 teaspoons vanilla extract
- 1 cup chocolate chips (or chopped dark chocolate)
- Optional: ¼ cup coconut oil (adds extra moisture)
Special Technique: Brown Butter Preparation
- Put butter in a light-colored saucepan over medium heat
- Stir occasionally as it melts and starts to foam
- Keep a close eye as the milk solids begin turning golden brown
- Pull it off the heat when the butter turns amber and smells nutty (about 5-7 minutes)
- Immediately transfer to a heat-safe bowl so it doesn’t keep cooking
- Let it cool a bit before using in the recipe
Step-by-Step Instructions
Follow the same general process as the traditional recipe, with these tweaks:
- Use your browned butter (cooled but still liquid) instead of softened butter
- Replace white and brown sugars with maple syrup
- Mix a little longer to make sure everything binds well with the almond flour
- Let the dough rest for 5 minutes before baking so the oats can soak up moisture
- Start checking for doneness earlier – almond flour browns faster than regular flour
Troubleshooting Guide: Common Issues Solved
Problem: Bars Are Too Crumbly
- Fix #1: Press that dough firmly into the pan – don’t be shy!
- Fix #2: For the gluten-free version, add 1-2 tablespoons of coconut oil for extra moisture
- Fix #3: Let them cool completely before cutting
- Fix #4: One clever baker shared: “I substituted olive oil instead of coconut oil and found it less crumbly/more held together!”
Problem: Bars Are Too Dry
- Fix #1: Cut your baking time by 2-3 minutes
- Fix #2: Toss in an extra tablespoon of butter
- Fix #3: Double-check your oven temperature with a thermometer – ovens love to lie!
Problem: Bars Won’t Set in the Middle
- Fix #1: Give them another 3-5 minutes in the oven
- Fix #2: Make sure your oven is completely preheated
- Fix #3: Check if your baking soda is fresh (it loses power over time)
Problem: Bars Stick to the Pan
- Fix: Always, always use parchment paper with overhang. I learned this lesson the hard way!
Mix-in Magic: Creative Variations
The basic recipe is like a blank canvas – here are some of my favorite combinations:
Sweet & Salty Combinations
- Dark chocolate + sea salt (my personal addiction)
- Salted caramel chips + pecans (tastes like a fancy dessert)
- Butterscotch chips + pretzels (sweet-salty heaven)
Fruit Forward Options
- White chocolate + dried cranberries (everyone asks for seconds!)
- Milk chocolate + dried cherries (like Black Forest cake in bar form)
- Dark chocolate + orange zest (sophisticated flavor combo)
- Cinnamon chips + diced apples (reduce slightly since apples add moisture)
Decadent Dessert Inspirations
- Toffee bits + milk chocolate (like a candy bar but better)
- Mini marshmallows + chocolate (s’mores vibes without the campfire)
- Peanut butter chips + strawberry jam swirl (PB&J nostalgia)
Protein-Boosted Versions
My gym buddy shared this brilliant tip: “I crushed walnuts to almost a powder to incorporate without changing texture” – genius way to add protein without sacrificing that perfect bar experience.
Storage, Freezing & Make-Ahead Tips
Counter Storage
Keep them in an airtight container at room temperature for up to 5 days. I slip pieces of parchment paper between layers to keep them from sticking together.
Refrigerator Storage
They’ll last 7-10 days in the fridge in an airtight container. Just let them come to room temperature before eating for the best texture (though I’ve been known to sneak bites straight from the fridge).
Freezer Storage
These freeze beautifully for up to 3 months:
- Cut into individual bars
- Wrap each one in plastic wrap
- Put wrapped bars in a freezer container or bag
- Thaw at room temperature for 1-2 hours when the craving hits
Make-Ahead for Events
One of my friends laughed that “The pan almost always comes home empty” from potlucks. For stress-free entertaining:
- Make the bars 1-2 days before your event
- Store uncut in the refrigerator (wrapped tightly)
- Bring to room temperature and cut just before heading out
Seasonal & Special Occasion Adaptations
Fall Harvest Version
Add 1 teaspoon pumpkin pie spice, swap half the chocolate chips for dried cranberries, and toss in ¼ cup pepitas for crunch. Tastes like autumn in a square!
Holiday Edition
Add ½ teaspoon each of cloves and nutmeg, use white chocolate chips, and mix in dried cranberries and pistachios for festive red and green colors. I make these every December, and people literally ask about them months in advance.
Summer Celebration Bars
Mix in lemon zest, dried blueberries, and white chocolate for a bright, summery twist that pairs perfectly with lemonade on the porch.
Birthday Celebration Variation
Fold in ¼ cup rainbow sprinkles and swap in white chocolate chunks. My nephew insisted these were better than birthday cake last year!
Why These Bars Create Lasting Memories
There’s something about oatmeal cookie bars that feels like home. Half Baked Harvest mentions their recipe was inspired by the author’s mother who was “famous for her oatmeal chocolate chip cookies.” Food memories run deep, don’t they?
I still remember my neighbor’s face lighting up when she tried these. “These were, without a doubt, the best oatmeal cookie bars me and my parents have ever had!” Another friend texted me during the Super Bowl: “Made these today… They’re exactly what I was looking for in an oatmeal cookie bar. Chewy, buttery, and perfectly oaty.”
These simple bars have a way of becoming your signature recipe – the one friends request by name and family members remember years later.
Conclusion: The Ultimate Crowd-Pleaser
Oatmeal cookie bars hit that sweet spot between “I don’t have much time” and “I want to make something special.” They give you all that homemade cookie goodness but in a format that’s quicker to make, easier to share, and somehow gets even better after a day or two (if they last that long!).
Whether you go classic or experiment with healthier versions, these adaptable bars work for just about any situation. They’re my go-to for busy weeknights when I need a homemade treat without the hassle, and they’re equally perfect for special occasions when I want to impress without spending half the day in the kitchen.
As you play with these recipes and create your own variations, I bet you’ll find yourself coming back to oatmeal cookie bars time and again. Sometimes the simplest treats create the most lasting impressions – and the biggest smiles around the table.
Have you tried making oatmeal cookie bars? Which mix-ins are your favorites? Share your experiences in the comments below!
Try Grandma’s Sugar Cookie Bars for another easy dessert option
Another sweet Recipe Sugar Spun Run’s Oatmeal Cookie Bars
PrintEasy Dairy-Free Oatmeal Cookie Bars in Just 30 Minutes
Perfect oatmeal cookie bars that are chewy, buttery, and incredibly easy to make. These bars offer the delightful texture of a cookie with less hassle.
- Prep Time: 15 mins
- Cook Time: 25-30 mins
- Total Time: 1 hr 45 mins
- Yield: 16–24 bars depending on size 1x
- Category: Dessert
- Method: Baking
- Cuisine: American
- Diet: Vegetarian
Ingredients
- 1 cup (2 sticks) unsalted butter, softened
- 1 cup packed brown sugar
- ½ cup granulated sugar
- 2 large eggs, room temperature
- 2 teaspoons vanilla extract
- 1½ cups all-purpose flour
- 1 teaspoon baking soda
- ½ teaspoon salt
- 1 teaspoon cinnamon (optional but so worth it)
- 3 cups old-fashioned rolled oats
- 1½ cups chocolate chips (semi-sweet, milk, or mix them up)
- Optional add-ins: 1 cup chopped walnuts, ½ cup coconut flakes, or ½ cup dried cranberries
Instructions
- Prep: Heat your oven to 350°F. Line a 9×13-inch baking pan with parchment paper, leaving some overhang.
- Cream butter and sugars: In a large bowl, beat the softened butter, brown sugar, and granulated sugar until combined and slightly lighter in color.
- Add wet ingredients: Beat in eggs one at a time, then stir in vanilla extract until mixed.
- Combine dry ingredients: In a separate bowl, whisk together flour, baking soda, salt, and cinnamon.
- Create dough: Gradually add dry to wet ingredients, mixing until combined. Fold in the oats, chocolate chips, and optional add-ins.
- Transfer and press: Spread dough in prepared pan, pressing firmly into corners and smoothing the surface.
- Bake: Bake for 25-30 minutes for a 9×13 pan, until edges are golden brown and center is set but still slightly soft.
- Cool completely: Let cool in the pan for at least 1 hour before lifting out using the parchment paper and cutting into squares.
Notes
- Room temperature ingredients blend better.
- Don’t overbake – they’ll continue to set as they cool.
- For clean-cut squares, refrigerate for 30 minutes before cutting.
- Try the salt trick: Sprinkle a tiny bit of flaky salt on top for enhanced flavor.
Nutrition
- Serving Size: 1 bar
- Calories: 200
- Sugar: 15g
- Sodium: 150mg
- Fat: 10g
- Saturated Fat: 5g
- Unsaturated Fat: 3g
- Trans Fat: 0g
- Carbohydrates: 27g
- Fiber: 2g
- Protein: 3g
- Cholesterol: 25mg
Keywords: oatmeal cookie bars, easy dessert, chewy bars, cookie bars, oatmeal bars